Deploying WebApps to Azure cloud
Web Apps are the best way to showcase multiple analytical results of a project in a single place.
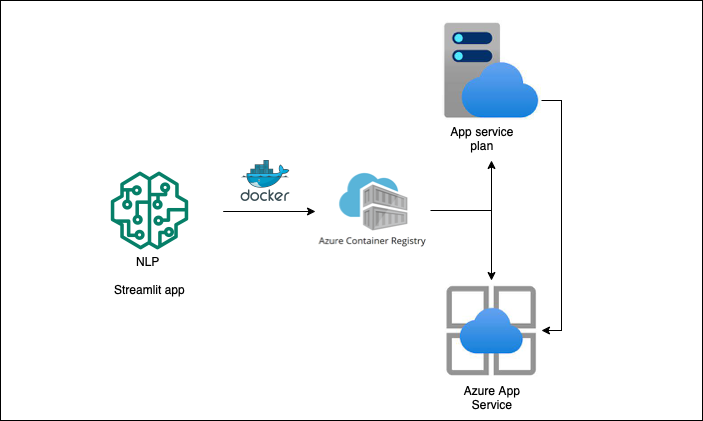
In this example we show how we can easily deploy streamlit apps to azure cloud. This post is not about how to build a Streamlit app but the deployment of it. The artitechture looks something like this.
Running the app in Docker
Foremost, to deploy the app you need the push all the dependencies and pack it into a Container.
The Dockerfile looks something like this.
FROM python:3.9
USER root

WORKDIR /app
COPY app.py requirements.txt ./

RUN pip install -r requirements.txt

EXPOSE 8501

WORKDIR /app

ENTRYPOINT [ "streamlit", "run" ]
CMD [ "app.py" ]
Lets go through this one by one.
Use an existing python image from Hub and user root as user. FROM python:3.9.
Next we create a working directory where all the app source code will live. This is done by COPY app.py requirements.txt ./ and then install the dependencies.
The app needs a port to be exposed so we specify that as EXPOSE 8501. You could any port as long as it is not used in any other running container.
Streamlit credentials. This is optional. I didnt see any particular use of this. But be sure to check out Streamlit’s documentation.
RUN mkdir ~/.streamlit
RUN cp config.toml ~/.streamlit/config.toml
RUN cp credentials.toml ~/.streamlit/credentials.toml
Test the Container locally.
# build
docker build -t <> .
# alternatively run with `--no-cache` to build from scratch.

# run
docker run -p <8501:8501> --name <name_the_runner> <container_name>
Deploy the container to Azure
Azure app service will pick up the container form Azure container registry and run the app from the container.
App service however requires an App service plan in place. So lets create the app service plan form the azure CLI. This will create a linux machine in the specified location. An App Service plan defines a set of compute resources for a web app to run. Check here for more information.
az appservice plan create -g <resource_group_name> -n <serviceplanname> -l <location> --is-linux --sku B1
Now build the container in azure registry.
az acr build --registry <registry_name> --resource-group <resource_group_name> --image <image_name> .
Create the web app by calling the contianer registry’s image url.
az webapp create -g <resource_group_name> -p <serviceplanname> -n <custom_url> -i nlpapp.azurecr.io/<image_name>:latest
Your app will be available at http://<custom_url>.azurewebsites.net/.